One of the best things about Amazon Lightsail is how easy it is to use. AWS provides world class hosting at a great price. As a result, it has been the first choice for many small to medium sized projects including this web site. With the correct Amazon Lightsail WordPress config and savvy plugin choices, you’ll run a site that is fast and secure.
This guide will concentrate on the configuration and optimization side of things. It is relatively easy to setup a new Lightsail instance and there are dozens of guides floating around. So let’s skip that. But before you continue, make sure you have setup a static IP for your instance.
The first thing to remember is that Amazon Lightsail uses a bitnami stack for WordPress. By default, the .htaccess is disabled for security and performance reasons. Edits to this file will need to be put into htaccess.conf manually. More on this later. First up lets change some passwords.
Table of Contents
Change Root/User Passwords
Start by switching to the root user. From there you can change passwords for the root user and the bitnami user. If this is a production server I recommend using very strong passwords from a password generator with at least 16 characters. Your Amazon Lightsail WordPress config should use strong passwords everywhere for production use.
					sudo su
passwd root
passwd bitnami
exit
Update Server
It’s important to keep your server up to date with the latest packages. Every once in a while it’s important yo upgrade your server too. Though the upgrade process can break things, it’s recommended to make backups and proceed with caution.
					sudo apt-get update
sudo apt-get upgrade
sudo reboot
Configure Date and Time
Debian flavors come with a very handy tool to configure the server’s date and time. There’s hundreds of choices, be sure to choose the correct one. Afterwards, run the date command to check your changes.
					sudo dpkg-reconfigure tzdata
date
Configure Hostname
Follow the instructions directly from Amazon’s documentation.
Configure AppArmor
AppArmor (“Application Armor”) is a Linux kernel security module that allows the system administrator to restrict programs’ capabilities with per-program profiles. It comes preloaded on many flavors of Linux. You need to check if it is installed and enforcing.
sudo aa-status
You should see multiple profiles loaded. Most of which should be in enforcing mode. Refer to a guide or the official site if it’s not setup. Though you might consider using an OS with AppArmor already setup.
Configure Firewall
A common utility used by several Linux instances to configure the local firewall is UFW (uncomplicated firewall). Basically is a front end for the popular iptables tool. You need to check if it’s installed and which profiles are active.
sudo ufw status
The status should be active. If it’s not installed you can get it using apt-get. Once it is installed, you need to configure it to allow only the services that you use. Add http and https for as well.
					sudo ufw allow ssh
sudo ufw allow http
sudo ufw allow https
Once UFW is setup, you need to check the status to ensure our entries are correct. Additionally, you need to enable it, if it’s not already enabled.
					sudo ufw status
sudo ufw enable
sudo reboot
The status should look like the following for a basic setup.
					Status: active

To                         Action      From
--                         ------      ----
22                         ALLOW       Anywhere
80                         ALLOW       Anywhere
443                        ALLOW       Anywhere
22 (v6)                    ALLOW       Anywhere (v6)
80 (v6)                    ALLOW       Anywhere (v6)
443 (v6)                   ALLOW       Anywhere (v6)
Configure Lightsail Firewall
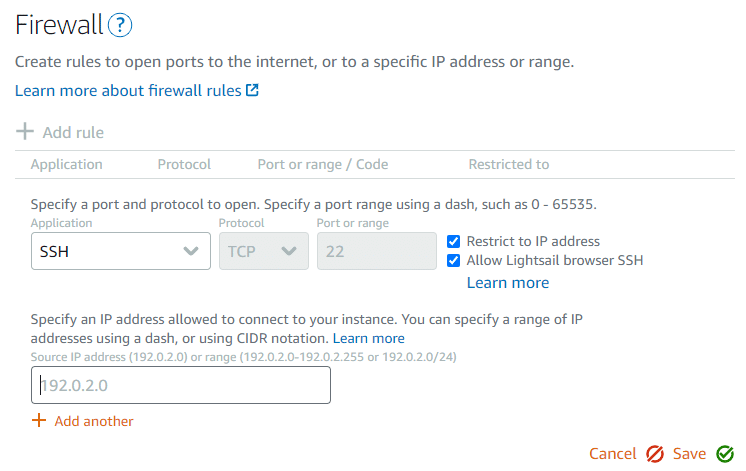
Your UFW configuration should jive with the firewall settings in the Amazon Lightsail dashboard. Create a new rule for SSH restricting access to an IP that you work from.

Setup SSL/TLS
A secure site is a requirement these days. Google ranks your site higher when you have HTTPS enabled. Considering how easy it is to setup, every site nowadays should have a secure connection.
Where you get your SSL certificate is irrelevant. The two main options are Let’s Encrypt and 3rd party SSL. Let’s Encrypt is a free solution supported by million of web sites. And secondly, 3rd party SSL refers to a SSL certificate purchased from GoDaddy, Comodo or another vendor. Since Let’s Encrypt only offers DV certificates, a 3rd party will be your only choice for OV and EV certificates.
*** Note: Change all instances of domain.com to your desired domain name. ***
Option 1: LetsEncrypt
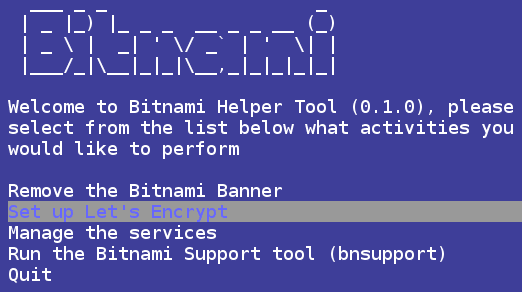
Bitnami provides a tool to setup Let’s Encrypt easily.
sudo /opt/bitnami/bnhelper-tool

Select “Set up Let’s Encrypt” and run through the wizard, it’s fairly straight-forward. Afterwards, you’ll need to take note of the absolute path of the SSL certificate and key on the filesystem.
Option 2: 3rd Party
This method is a little more in-depth and meant for any kind of SSL certificate you purchase from a 3rd party, for example GoDaddy or Sectigo. First thing, install OpenSSL. Next run the open-ssl command to generate a CSR (Certificate Signing Request) with a 2048 bit key. Lastly, you need to concatenate the request so you can copy and paste to the 3rd party web site.
					cd ~
sudo apt-get install open-ssl
sudo openssl req -new -newkey rsa:2048 -nodes -keyout domain.com.key -out domain.com.csr
sudo cat domain.com.csr
Once your certificate has been issued you must download it. Next, you’ll need to unzip the download if needed then upload the files onto your Lightsail instance. Preferably in your home directory.
Create a chained certificate by concatenating your domain certificate with the intermediate certificate. Remove the last certificate from the chain to prevent chain issue “contains anchor”.
					cd ~
cat bf7adaaaaa23ec23.crt gd_bundle-g2-g1.crt >> domain.com.chained.crt
sudo vi domain.com.chained.crt # Remove last cert
After you prepare your certificate, you’ll need to move it to a good location on the filesystem then change the ownership and permissions. The recommended location is /usr/local/share/ca-certificates/ for compatibility reasons.
					sudo mv domain.com.chained.crt /usr/local/share/ca-certificates/domain.com.chained.crt
sudo mv domain.com.key /etc/ssl/private/domain.com.key
sudo chown root.root /usr/local/share/ca-certificates/domain.com.chained.crt
sudo chown root.root /etc/ssl/private/domain.com.key
sudo chmod 644 /usr/local/share/ca-certificates/domain.com.chained.crt
sudo chmod 700 /etc/ssl/private/domain.com.key
sudo update-ca-certificates

# Look for domain.com.pem from update-ca-certificates command
ls -l /etc/ssl/certs/
Apache SSL Setup
With both of the above options, you’ll have a SSL certificate installed somewhere on your filesystem. Apache will need to know where this file is. Let’s edit the config file, make a backup first if needed.
sudo vi /home/bitnami/stack/apache2/conf/bitnami/bitnami.conf
Make the following edits for the default vhost. Edit SSLCertificateFile and SSLCertificateKeyFile to point to the location of your certificate and key.
					SSLCertificateFile "/etc/ssl/certs/domain.com.chained.pem"
SSLCertificateKeyFile "/etc/ssl/private/domain.com.key"
Restart Apache then visit your site using https://domain.com. You should see a padlock icon in the address bar with no errors.
sudo /opt/bitnami/ctlscript.sh restart apache
Disable TLSv1.0 and TLSv1.1
The TLS 1.0 and 1.1 protocols have multiple known security vulnerabilities. You should disable these protocols to improve the security of your site.
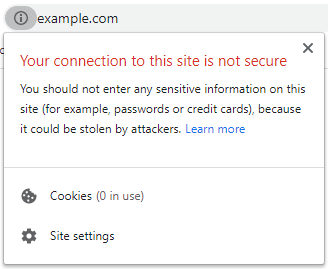
As of January 13, 2020, if your site uses TLS 1.0 or 1.1 Google Chrome will display the error shown below. In 2021 Chrome will not load web sites with TLS 1.0 or 1.1. Apparently.

You can disable these protocols by making a change to the config file.
sudo vi /opt/bitnami/apache2/conf/bitnami/bitnami.conf
Make the following edits for the default vhost. Edit SSLProtocol.
SSLProtocol TLSv1.2
Save and exit. Then edit another Apache config file. Create a backup of the file first if needed.
sudo vi /opt/bitnami/apache2/conf/extra/httpd-ssl.conf
Comment out (add # to the start of the line) the following lines:
					SSLCipherSuite HIGH:MEDIUM:!MD5:!RC4:!3DES
SSLProxyCipherSuite HIGH:MEDIUM:!MD5:!RC4:!3DES
Uncomment out (remove # from the start of the line) the following lines:
					#SSLCipherSuite HIGH:MEDIUM:!SSLv3:!kRSA
#SSLProxyCipherSuite HIGH:MEDIUM:!SSLv3:!kRSA
Look for the “SSL Protocol support” section. Edit SSLProtocol and SSLProxyProtocol to only use current protocols.
					SSLProtocol -TLSv1.2 -TLSv1.3 -SSLv3
SSLProxyProtocol -TLSv1.2 -TLSv1.3 -SSLv3
Restart Apache.
sudo /opt/bitnami/ctlscript.sh restart apache
Use an online tool to inspect your SSL implementation quality. One widely used tool is the SSL Server Test (Powered by Qualys SSL Labs). You should get grade “A” if you completed this guide.
Enable HTTP/2
The industry recommends moving to HTTP/2 if possible however HTTP/1.1 will be supported for many years to come. Apache does not enable HTTP/2 out of the box for several reasons, mostly compatibility. You’ll need to edit the httpd.conf file, make a backup if needed.
sudo vi /opt/bitnami/apache2/conf/httpd.conf
Uncomment out (remove # from the start of the line) the following lines:
#LoadModule http2_module modules/mod_http2.so
Save and exit. Then edit another Apache config file. Create a backup of the file first if needed, though one should already exist if you followed this guide.
sudo vi /opt/bitnami/apache2/conf/bitnami/bitnami.conf
For each vhost, add this before the end (create a new line right before the </VirtualHost> tag):
Protocols h2 h2c http/1.1
Restart Apache.
sudo /opt/bitnami/ctlscript.sh restart apache
Use an online tool to inspect your HTTP/2 settings such as KeyCDN’s HTTP/2 Test. You should see the messages: “HTTP/2 protocol is supported” and “ALPN extension is supported”.
Enable mod_expires Apache Module
This module controls the setting of the “Expires” HTTP header and the “max-age” directive of the Cache-Control HTTP header in server responses. With this setting and sensible expiry times, you will improve your site’s caching mechanism, thus improving your PageSpeed score. You can start by editing the httpd.conf file. Make a backup if needed.
sudo vi /opt/bitnami/apache2/conf/httpd.conf
Uncomment out (remove # from the start of the line) the following lines:
#LoadModule expires_module modules/mod_expires.so
Save and Exit. Now you’ll need to add a config block to your htaccess.conf file with expiry time for each file type. This block is automatically added to the .htaccess file which we know is disabled on bitnami stacks.
sudo vi /opt/bitnami/apps/wordpress/conf/htaccess.conf
Add this block if you do not use a caching plugin. Otherwise copy your entire caching plugin’s config from .htaccess to htaccess.conf. The expiry times in this config reflect sensible values.
					<IfModule mod_expires.c>
	ExpiresActive on
	ExpiresDefault                              "access plus 1 month"
	# Re-requests in FF 3.6
	ExpiresByType text/cache-manifest           "access plus 0 seconds"
	# Your document html
	ExpiresByType text/html                     "access plus 0 seconds"
	# Data
	ExpiresByType text/xml                      "access plus 0 seconds"
	ExpiresByType application/xml               "access plus 0 seconds"
	ExpiresByType application/json              "access plus 0 seconds"
	# Feed
	ExpiresByType application/rss+xml           "access plus 1 hour"
	ExpiresByType application/atom+xml          "access plus 1 hour"
	# Favicon (cannot be renamed)
	ExpiresByType image/x-icon                  "access plus 4 months"
	# Media: images, video, audio
	ExpiresByType image/gif                     "access plus 4 months"
	ExpiresByType image/png                     "access plus 4 months"
	ExpiresByType image/jpeg                    "access plus 4 months"
	ExpiresByType image/webp                    "access plus 4 months"
	ExpiresByType video/ogg                     "access plus 1 month"
	ExpiresByType audio/ogg                     "access plus 1 month"
	ExpiresByType video/mp4                     "access plus 4 months"
	ExpiresByType video/webm                    "access plus 1 month"
	# HTC files  (css3pie)
	ExpiresByType text/x-component              "access plus 1 month"
	# Webfonts
	ExpiresByType font/ttf                      "access plus 4 months"
	ExpiresByType font/otf                      "access plus 4 months"
	ExpiresByType font/woff                     "access plus 4 months"
	ExpiresByType font/woff2                    "access plus 4 months"
	ExpiresByType image/svg+xml                 "access plus 4 months"
	ExpiresByType application/vnd.ms-fontobject "access plus 1 month"
	# CSS and JavaScript
	ExpiresByType text/css                      "access plus 1 year"
	ExpiresByType application/javascript        "access plus 1 year"
</IfModule>
Restart Apache.
sudo /opt/bitnami/ctlscript.sh restart apache
To check if your changes produce the desired effect, run a GTmetrix test on your home page. Under the “YSlow” tab you should a heading “Add Expires headers”. This should grade A(100) unless you have some files that should not cache into the far future such as Google Analytics linkid.js or Font Awesome fonts from a plugin. In this case, just leave them be.
Disable PageSpeed for Caching Plugins
PageSpeed (mod_pagespeed) is an apache module that optimizes your site automatically, it has caching built-in. The problem is that it conflicts with caching plugins. For example, some WP-Rocket features do not work properly with PageSpeed. As a result, we should disable it because the caching plugin will essentially do the same thing.
sudo vi /opt/bitnami/apache2/conf/httpd.conf
Comment out (add # to the start of the line) the following lines:
					Include conf/pagespeed.conf
Include conf/pagespeed_libraries.conf
Save and Exit. Then we need to restart Apache.
sudo /opt/bitnami/ctlscript.sh restart apache
Don’t forget to clear the cache in your caching plugin.
.htaccess and htaccess.conf on Bitnami Stacks
I previously mentioned there are some nuances with a using a bitnami stack. One of the main differences is the .htaccess in the htdocs directory is not used, at all. The htaccess.conf in the config folder, beside htdocs, is used. This is for security.
This poses a problem because some plugins will attempt to modify the default .htaccess file to enable a feature. This includes caching plugins, image compression plugins, security plugins and many more. Some plugins have the option to not write to .htaccess and some even write to htaccess.conf instead.
The best solution I’ve found is to copy the contents on the .htaccess to htaccess.conf. Though some modification need to be made. For example, “RewriteBase” rules will not work. Additionally, the Authorization header must be defined here.
					# BEGIN WordPress
<IfModule mod_rewrite.c>
RewriteEngine On
RewriteRule .* - [E=HTTP_AUTHORIZATION:%{HTTP:Authorization}]
</IfModule>
# END WordPress

# Copy content of the plugin configs from .htaccess
# Caching plugin
# Security plugin
# SSL plugin
# Several other site critical plugins
By default the file permissions of the .htaccess and htaccess.conf will only allow owner to write. To write to these file you must allow write access.
sudo chmod 664 /opt/bitnami/apps/wordpress/conf/htaccess.conf
Save and Exit. Then we need to restart Apache.
sudo /opt/bitnami/ctlscript.sh restart apache
GTMetrix and Lighthouse
Getting 100% for everything requires a little more legwork. On addition some things are just simply not supported. Or some external scripts change so frequently, it’s not worth caching them. Eg. Google Analytics. These will likely have no difference on your actual load times but it’s fun to try. Just don’t get stuck with old GA code and skew your analytics. Google it.
In the end, your Amazon Lightsail WordPress config will likely include tweaks to many more aspects of your stack. This guide is just the major stuff but it will set you up for production and thus ready for the potential hazards from bots, scammers and hackers.

